Taking your research online
You have received an e-mail from a good colleague.
email from Galileo
Hi again!
Thanks for sending me the notebook you prepared but I cannot open it. How can I see it? Also, I will be travelling during the following days, if you could send me something I can explore from my mobile phone, that would be great!
Cheers,
Galileo
We need to compile all our results and send them in a format that helps understanding the process and the results of our analysis. One common and terrible approach would be to describe the details and results in the body of the e-mail and send different figures as attachments. This is a poor approach that complicates visualization, makes it difficult to connect description with figures, and that probably will miss details on how the results were obtained. Alternatively, we could generate a .doc document with comments and plots and send it as a pdf but these are not designed to share the source code of your analysis and avoid making your research really open.
The alternative we propose is to use a Jupyter notebook, which has several advantatges:
- It is easy to export as pdf or html, and can be visualized in nearly any platform.
- It can be easily shared and visualized in Github.
- It naturally contains the results and the logic followed to obtain them, as already seen in the previous chapter
- You can seamlessly match explanations, code and results in a continuous narrative.
- You can easily update them, add or remove content or make small changes.
- It can explicitly show the full process of your science.
You can even write whole books in Github (see Other resources
Objectives and scope
In this section we will show how to use Github to share results with the community or your colleagues. You will be able to share code, text documents, figures or notebooks, which can be rendered automatically.
- Start an account
- Start a repository (Description, README, LICENSE)
- Upload files
- Make changes to file and commit them
- View differences and history
- Share your work!
We will use Github, but there are other platforms that offer very similar services and work in almost the same way. We recommend you take a look at Gitlab, and Bitcucket as perfectly viable alternatives.
What is Github and how does it work
GitHub is a code hosting platform for version control and collaboration. It lets you and others work together on projects from anywhere. Developing your project or analysis collaboratively on GitHub or GitLab provides a prompter to document your work in detail and it provides a great opportunity to get additional contributors to your idea. Contributions can be everything from new ideas, to bug reports and actual code contributions.
The platform uses version control via git, so you will have a complete history
of all the changes for all the files, and when and who commited those changes.
So no more files ending with _v2_final_reviewed_Feb_finalfinal.pdf.
Additionally, you have an issue tracker to focus discussions on specific topics
easy, a build-in wiki, and even space to host web pages. For the moment, we
will focus on the specific features to solve the particular problem exposed in
this section: we need to share a document with a collaborator.
Share your work with a collaborator
Make an account
Just navigate to the main page and you will be prompted to Sign up in Github. Just enter your username, email and password. The username will be used to identify you and also it will be used as home path for all your repositories. Your email will be private.
Initialize a repository
A repository is usually used to organize a single project. Repositories can contain folders and files, images, videos, spreadsheets, and data sets – anything your project needs.
- In the upper right corner, next to your avatar or identicon, click + and then select New repository. Name your repository, for example
test. - Write a short description of the purpose of this repository. You can write or change it later. For example: "This project is to share files with my collaborator"
- You can choose if you want to make it Public or Private. Public repos will be searchable by anyone, so the whole community will be able to access the files, comments, etc. Private repos will only be available to the users you explicitly invite.
Warning
Github now offers unlimited private repositories for unlimited collaborators, before April 2020 those were limited to three collaborators changes to GitHub's plans.
- Select Initialize this repository with a README (see next section).
- Add a license. If in doubt read section below or select
GNU General Public License v3.0. - Add .gitignore: not very relevant now, but if it is a python-based project, select
Python.
And you are good to go!
You will immediately see your repository located at https://github.com/<username>/<reponame>. You will see this:
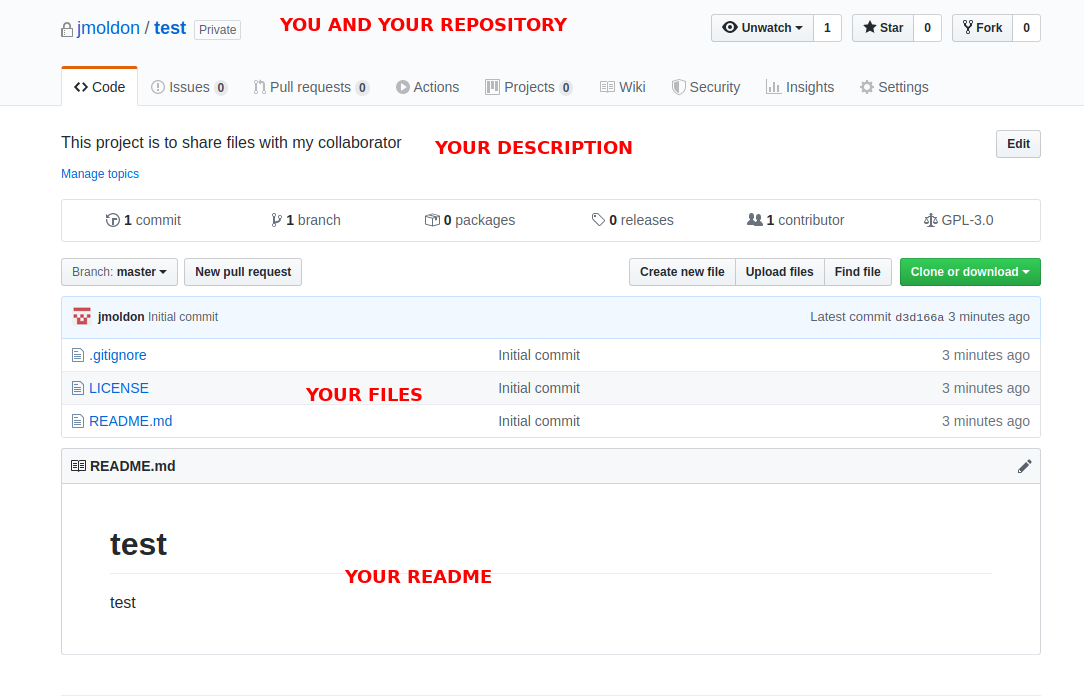
You can navigate to the available files: .gitignore, LICENSE and README.md.
Write a README file (make and commit changes)
It is always a good idea to have a README.md file in each repository, it will be useful for yourself and any visitor to know the details about the repository. README files are the welcome mat for your project. They are the first thing new visitors to your project will see and thus are part of a set of really important documents to make potential contributors feel welcome and invite them to get involved. Your README file should cover:
- What you are doing, for who, and why.
- What makes your project special and exciting.
- How to get started.
- Where to find key resources
We will practise how to make changes to a file with the README.md file.
- Click the
README.mdfile. You will see the rendered version of the Markdown file. - Click the pencil icon in the upper right corner of the file view to edit. You will see the plain-text Markdon file. You can use all the markdown syntax features we saw in Some Markdown basics. Write some more details about the repository, at least a few separate lines. Also, remove some of the existing lines.
- Commit your changes so the file is actually modified. You can change the master branch (default) as we are not using other branches now.
On GitHub, saved changes are called commits. Each commit has an associated commit message, which is a description explaining why a particular change was made. Commit messages capture the history of your changes, so other contributors can understand what you’ve done and why.
Check what changes have happened
First, go back to the repository by clicking on its name on the top of the
page. You will see that the README file now contains your changes. If you see
the "commits" section now should contain at least 2 (the initial commit when
you created the files in the repository, and the change you just committed).
Click on the commits section. You will see a list with the full history of
changes (commits) in your repository. A commit may contain changes from several
files. Click on the name of the first commit (or in the 7-letter code on the
right). You will see a diff view of the file, showing exactly which lines
were added, which were removed and which words were changed. Maybe your file
does not suffered significant changes, you can see a random example of a commit
here.
Add new files - share your Jupyter notebook
The purpose of this repository was to share files with external collaborators. Go back to the home page of your repository. On the right, before the list of files you will see a menu with "Create new file", "Upload files" and "Find file". Click on "Upload files" and find a file you would like to upload (note that if your repository is public, any file you upload will be visible by anyone).
Upload a Jupyter notebook. If you don't have any, you can upload the notebook from the previous session, that you can find here or download it from a terminal with:
wget https://raw.githubusercontent.com/spsrc/droplets/master/gaia_exploratory/jupyter_exploratory.ipynbUpload the file from your computer, write a commit message describing what you have done, and if you want update the README.md file to explain that the notebook is now available in the repository.
The uploaded files will show in the home page of the repository. If you navigate the .ipynb file Github will render the contents for you. If you share that path to your collaborators, they will be able to see your analysis!
Additional features with branches
This approach works well with a reduced number of collaborators, but it is also a good idea to use features like branches that allow you to work in parallel on new changes, developments and versions without disturbing the master (stable) branch. Once you are happy with the modification implemented in a particular branch, you can merge it with the master branch. We recommend you follow the Hello World example in the Github Guides. In the next section we will work on how to use the command-line tool git to manage all these changes and synchronize the contents of the Github webpage with your local computer.
Conclusions
With this information you can maintain a repository with the files you need for your research, including text files, notebooks, pdfs, images, etc. Github is not the right place to keep heavy files (limit is 100MB) or data. You can keep the files and notes for each project in a different repository if you want. At the minimum, you will always have a backup of all the relevant files with a detailed history of all versions you produced.
If you share the link to the notebook with collaborators, they should see the rendered version of the notebook, like this:
Exploratory analysis of Gaia data
This can be opened from any browser, including mobile phones with very good quality.
Other resources
- You can even write books on Github! This is an example and the Github repository.
- You can also write papers on Github! Mutiband Lomb-Scargle Periodograms. In this example, the author even received feedback from a world expert on the topic as a Github issue while writing the paper. Check this talk explaining the experience In Defense of Extreme Openness
- To learn more: Github Guides
- You can also write and host your personal webpage in Github: examples